티스토리 뷰
안녕하세요 너무 오랜만에 블로그에 찾아왔습니다.
공부하던 시절 개발 현직자 분들이 현업에서 일하며 글쓰기 쉽지 않다는 말이 이제서야 공감이 가네요.. 좀 더 부지런해져야 겠습니다.
오늘은 프로젝트에서 구현했던 부분인 슬라이더 라이브러리 Swiper를 소개해볼까 합니다. 개인프로젝트와 직접 업무에 뛰어들면서의 차이는 디자인과 같게 구현해야한다는 점이죠. 이러한 면에서 어느정도 커스텀이 유용한 라이브러리를 찾는 것도 중요하다는 생각이 드는데요,
처음에는 Slick이라는 라이브러리를 설치해 구현했다가 디자인대로 커스텀하는 것에서 불편함이 느껴져서 다시 찾아보았고,
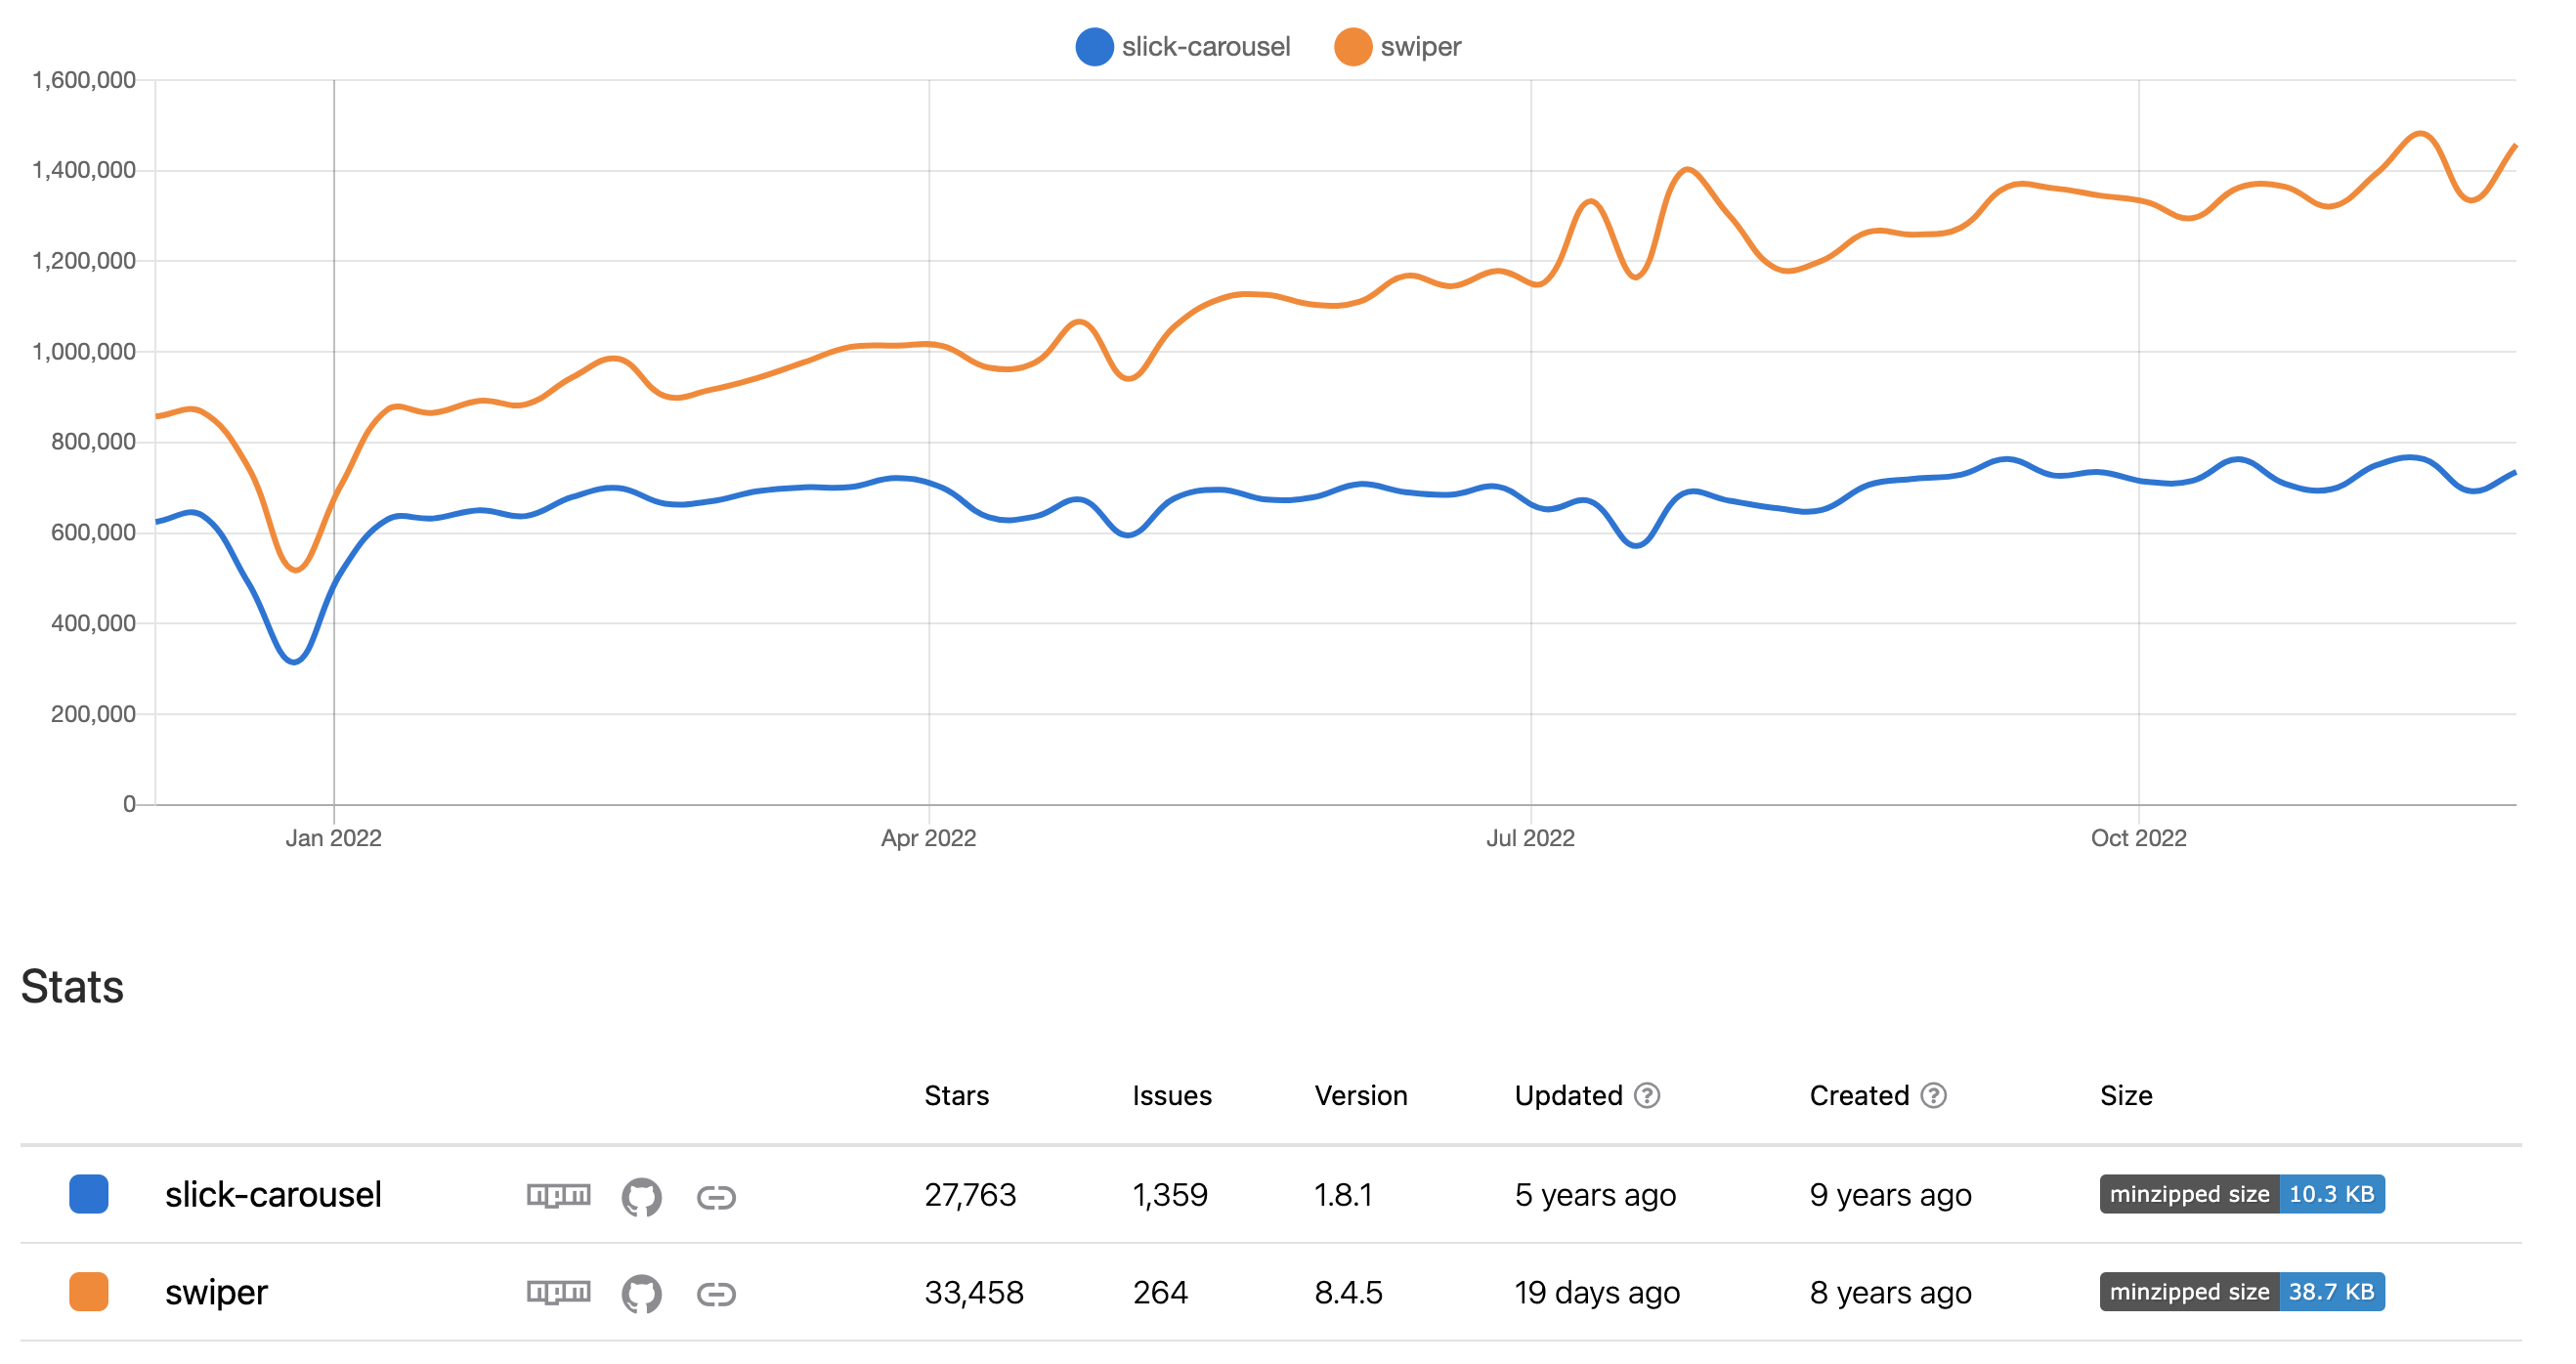
npm trends에서도 최근 1년 사용성도 더 많고 업데이트도 빠르며 데모(Demo)가 잘 나와있는 Swiper라는 라이브러리르 사용하게 되었습니다.

결론적으로는 슬라이더/ 캐러셀 구현이라면 압도적으로 Swiper를 추천하는 바입니다.
소개드릴 슬라이드 / 캐러셀 UI는 세 가지입니다.
1. 배너 이미지 슬라이드
2. 카드형 이미지 슬라이드
3. 카드형 + 모달 캐러셀 슬라이드
Tip. 재사용성을 위한 슬라이드 컴포넌트화
Swiper + Chakra ui + SCSS 조합으로 커스텀한 코드로
아래로 갈 수록 커스텀이 많아지니 참고해주세요.
1. 배너 이미지 슬라이드
Swiper styling을 위해 필요한 것들을 import해옵니다.
공식문서의 데모에서 보고 필요한 모듈을 가져와서 활용합니다.

많이 사용하는 Swiper에서 제공하는 옵션들입니다.
slidesPerView : 'auto', // 한 슬라이드에 보여줄 갯수
spaceBetween : 6, // 슬라이드 사이 여백
loop : false, // 슬라이드 반복 여부
loopAdditionalSlides : 1, // 슬라이드 반복 시 마지막 슬라이드에서 다음 슬라이드가 보여지지 않는 현상 수정
pagination : false, // pager 여부
autoplay : { // 자동 슬라이드 설정 , 비 활성화 시 false
delay : 3000, // 시간 설정
disableOnInteraction : false, // false로 설정하면 스와이프 후 자동 재생이 비활성화 되지 않음
},
navigation: { // 버튼 사용자 지정 nextEl: '.swiper-button-next', prevEl: '.swiper-button-prev', },
이 외 더 많은 커스텀하기 위한 옵션들이 있습니다.
제가 사용한 *watchOverFlow는 슬라이더가 1개일 때 pager와 button을 숨겨주는 속성입니다.
import { Autoplay, Pagination, Parallax } from 'swiper';

import 'swiper/css';
import 'swiper/css/navigation';
import 'swiper/css/pagination';
import { Swiper, SwiperSlide } from 'swiper/react';


const HomeSlider = () => {
 ...

  return (
    <>
      {bannerData && (
        <Swiper
          style={{
            width: '100%',
            height: '100%',
          }}
          autoplay={{
            delay: 3000,
            disableOnInteraction: false,
          }}
          speed={600}
          parallax={true}
          pagination={{
            clickable: true,
          }}
          resistanceRatio={0}
          modules={[Parallax, Pagination, Autoplay]}
          watchOverflow={true}
          className="bannerSwiper"
        >
          {bannerData?.results.map((item) => {
            return (
              <SwiperSlide key={item.id}>
                <ChakraNextImage
                  w="100%"
                  h={['500px', '500px', '500px', '500px', '500px', '800px']}
                  nextImageConfig={{ src: item.image, objectFit: 'cover' }}
                >
                  <Flex
                    direction="column"
                    h="100%"
                    w="100%"
                    alignItems="center"
                    justifyContent="center"
                  >
                    <Text
                      textAlign="center"
                      textStyle="sliderTitle"
                      whiteSpace="pre-line"
                      bg="secondary"
                      css={{
                        WebkitBackgroundClip: 'text',
                        WebkitTextFillColor: 'transparent',
                      }}
                      fontWeight="bold"
                    >
                      {item.title}
                    </Text>
                    <VStack
                      w={['300px', '540px', '600px']}
                      m="0 auto"
                      textAlign="center"
                      alignItems="center"
                    >
                      <Text
                        textStyle="sliderContent"
                        pt="15px"
                        pb={['51px', '40px']}
                        color="white"
                      >
                        {item.content}
                      </Text>
                      <GradientButton
                        isCenter
                        onClick={() => routeHandler(item.url)}
                      />
                    </VStack>
                  </Flex>
                </ChakraNextImage>
              </SwiperSlide>
            );
          })}
        </Swiper>
      )}
    </>
  );
};
export default HomeSlider;
Styling Pagination Button
페이지네이션 butllet형태를 커스텀하기 위해서 css를 사용하였습니다.
.swiper-pagination-bullet 와 .swiper-pagination-bullet-active 라는 className으로 쉽게 스타일링 할 수 있습니다.
swiper.scss

div.swiper {
  &.bannerSwiper {
    .swiper-pagination {
      bottom: 30px;

      .swiper-pagination-bullet {
        background-color: white;
        border-radius: 50%;
        width: 6px;
        height: 6px;
        margin: 0 6px;
      }

      .swiper-pagination-bullet-active {
        border-radius: 100px;
        width: 20px;
      }
    }
  }
}
2. 카드형 이미지 슬라이드

해당 슬라이드에 필요한 모듈을 import합니다.
반응형으로 구현함에 있어서 Swiper의 옵션만으로는 부족함이 있어 역시 css로 따로 스타일링을 해주었습니다.
   <Swiper
        className="cardSwiper"
        modules={[Scrollbar, Pagination]}
        style={{ padding: '20px 0 40px 0' }}
        spaceBetween={30}
        slidesPerView={'auto'}
        scrollbar={true}
   >
        {data?.results.map((item) => {
          return (
            <SwiperSlide key={item.id}>
              <GlobalCard cardData={item} />
            </SwiperSlide>
          );
        })}
  </Swiper>
Styling Scrollbar
sipwer.scss

div.swiper {
  &.cardSwiper {
    margin: 0;
    padding: 0;

    .swiper-slide {
      width: fit-content;
      height: auto;
      font-size: 0px;
    }

    .swiper-scrollbar {
      background: $gray;
      left: 10px;
      bottom: 1px;
      height: 2px;
      bottom: 5px;
      width: 100%;

      .swiper-scrollbar-drag {
        height: 2px;
        border-radius: 0px;
        background-color: $black;
      }
    }
  }
}
3. 내 입맛대로 바꾸는 캐러셀 구현
Swiper에서 제공하는 스타일링을 아예 빼고 본인의 입맛대로 커스텀할 수 있게 많은 옵션들을 제공합니다.

먼저 css에서 보여주고 싶지 않은 부분의 className을 잡아와 display:none 을 먼저해줍니다.
$black: #222222;
$gray: #e5e7ec;


// scss를 활용한 공통 스타일 생성
@mixin swiperCommonStyle() {
  position: relative;
  margin: 0 auto;
  padding-bottom: 30px;

  .swiper-slide {
    width: fit-content;
    height: auto;
    font-size: 0px;
  }

  .swiper-scrollbar {
    display: none;
  }


  .swiper_wrap {
    height: 100%;
    width: 100%;
    position: relative;
    display: block;
    text-align: left;
  }

  // 해당 버튼은 커스텀하기 위한 버튼이기 때문에 스타일링에서 보여주지 않습니다.
  .swiper-button-next::after,
  .swiper-button-prev::after {
    display: none;
  }

  .swiper-pagination {
    position: absolute;
    text-align: center;
    color: white;
    left: 50%;
    top: 0;
    margin: 0;
  }
}

// 적용

div.swiper {
  &.photoSwiper {
    @include swiperCommonStyle();
    .swiper-wrapper {
      padding-top: 30px;
    }
  }

  &.modalSwiper {
    @include swiperCommonStyle();
  }

  &.videoSwiper {
    @include swiperCommonStyle();

    .swiper-wrapper {
      justify-content: space-between;
    }
  }
}
<Swiper
className="modalSwiper"
// 좌/우 버튼을 커스터마이즈 하기 위해 커스터마이즈 element에 넣어줄 classNmae을 명명합니다.
navigation={{
prevEl: '.prev',
nextEl: '.next',
}}
// 페이지네이션을 커스터마이즈 하기 위해 element에 클래스명을 넣어줍니다.
pagination={{
type: 'custom',
el: '.custom_pagination',
clickable: true,
}}
// swiper의 현재 index를 Set해줍니다.
onSlideChange={(swiper) => {
setCurrModalSwiperIdx(swiper.realIndex);
}}
// swiper가 처음 실행될 때 클릭한 해당 index인 슬라이드를 보여줍니다.
onSwiper={(swiper) => {
if (swiper.isBeginning) swiper.slideTo(selectedPhotoIdx, 0);
}}
modules={[Pagination, Navigation]}
>
컴포넌트 적용
반응형 스타일링을 위해 적용했던 부분은 삭제했습니다.
import { Navigation, Pagination } from 'swiper';

import { Swiper, SwiperSlide } from 'swiper/react';

const MediaModal = () => {
  const [currModalSwiperIdx, setCurrModalSwiperIdx] =
    useState(selectedPhotoIdx);

  return (
    <>
      <Modal isCentered size="full">
        <ModalContent>
          <ModalHeader>
            // 전체 슬라이드 개수와 현재 슬라이드 번호를 알려줍니다. ( 1/5 )
            <Text className="custom_pagination">
              {`${currModalSwiperIdx + 1} / ${photos.length}`}
            </Text>
          </ModalHeader>

          <ModalBody
            display={'flex'}
            flexDirection={'column'}
            justifyContent={'center'}
          >
            <HStack justifyContent={'space-around'}>
              // 좌측 버튼을 Swiper에서 정한 className으로 넣어줍니다.
              <Box className="prev">
                <CarouselArrowLeftIcon fontSize={'55px'} cursor="pointer" />
              </Box>

              <Box>
                <Swiper
                  className="modalSwiper"
                  navigation={{
                    prevEl: '.prev',
                    nextEl: '.next',
                  }}
                  pagination={{
                    type: 'custom',
                    el: '.custom_pagination',
                    clickable: true,
                  }}
                  onSlideChange={(swiper) => {
                    setCurrModalSwiperIdx(swiper.realIndex);
                  }}
                  onSwiper={(swiper) => {
                    if (swiper.isBeginning) swiper.slideTo(selectedPhotoIdx, 0);
                  }}
                  modules={[Pagination, Navigation]}
                >
                  {photos.map((imageSrc, idx) => {
                    return (
                      <SwiperSlide key={idx}>
                        <Box>
                          <figure
                            style={{ width: '100%', cursor: 'pointer' }}
                            onClick={onOpenPhoto}
                          >
                            <Image
                              src={imageSrc}
                              alt={`mobile_photo_${idx}`}
                              objectFit="cover"
                              borderRadius={'15px'}
                            />
                          </figure>
                        </Box>
                      </SwiperSlide>
                    );
                  })}
                </Swiper>
              </Box>
			 // 우측 버튼을 Swiper에서 정한 className으로 넣어줍니다.
              <Box className="next">
                <CarouselArrowRightIcon fontSize={'55px'} cursor="pointer" />
              </Box>
            </HStack>
          </ModalBody>
          <ModalFooter />
        </ModalContent>
      </Modal>
    </>
  );
};

export default MediaModal;
Tip. 재사용성을 위한 슬라이드 컴포넌트화
프로젝트 내에서 슬라이더 사용이 많아진다면 슬라이드 내용들을 children으로 받는 재사용성을 위한 컴포넌트를 만들어 두는 것도 좋은 방법입니다.
import { Pagination, Scrollbar } from 'swiper';

import 'swiper/css';
import 'swiper/css/navigation';
import 'swiper/css/scrollbar';
import { Swiper, SwiperSlideProps } from 'swiper/react';

interface slideProps {
  children: any;
  className?: string;
}

const SlideSwiper = ({ children, className }: slideProps) => {
  return (
    <Swiper
      style={{ padding: '20px 0 40px 0' }}
      className={className}
      modules={[Scrollbar, Pagination]}
      spaceBetween={30}
      slidesPerView={'auto'}
      scrollbar={true}
    >
      {children}
    </Swiper>
  );
};

export default SlideSwiper;
해당 프로젝트에서 슬라이더를 많이 사용하여 재사용성을 위한 슬라이더 컴포넌트를 생성하였습니다.
적용 예시
import { useState } from 'react';

import { Pagination, Scrollbar } from 'swiper';

import 'swiper/css';
import 'swiper/css/navigation';
import 'swiper/css/scrollbar';
import { Swiper, SwiperSlide } from 'swiper/react';

const Component = () => {
  const [swiperIdx, setSwiperIdx] = useState<number>(0);

  return (
    <Swiper
      style={{ padding: '20px 0 40px 0' }}
      className="photoSwiper"
      modules={[Scrollbar, Pagination]}
      spaceBetween={30}
      slidesPerView={'auto'}
      scrollbar={true}
      onClick={(swiper) => setSwiperIdx(swiper.clickedIndex)}
      slideToClickedSlide
    >
      {showData?.photo.map((item) => {
        return (
          <SwiperSlide key={item.id}>
            <PhotoContent
              imageSrc={item}
              photos={showData?.photo}
              selectedPhotoIdx={swiperIdx}
            />
          </SwiperSlide>
        );
      })}
    </Swiper>
  );
};

export default Component;
'Frontend > React' 카테고리의 다른 글
| React Query의 setQueryData 활용한 캐싱된 데이터 업데이트 훅 소개 (0) | 2023.11.03 |
|---|---|
| [React] 무한스크롤 렌더링에 유용한 InfinityList 생성기 (0) | 2023.10.07 |
| [React] Google OAuth 인증 팝업 모드로 구현하기 (1) | 2023.04.16 |
| [React date picker] 리액트 Date picker 커스텀하기 (with TypeScript) (0) | 2022.10.08 |
- Total
- Today
- Yesterday
- 모두를위한컴퓨터과학
- 자바스크립트알고리즘
- 타입스크립트
- React
- network
- 리액트
- python
- GIT
- 프로그래머스
- 자바스크립트 비동기 처리
- 항해99
- React Query
- 실전프로젝트
- 프로그래머스 베스트앨범 자바스크립트
- 자바스크립트 클로저
- github
- 자바스크립트
- cs50
- 리액트네이티브
- 알고리즘자바스크립트
- 모두를 위한 컴퓨터 과학
- javascript
- 프로그래머스 자바스크립트
- 무한스크롤
- reactquery
- 백준
- css
- 클로저
- 네트워크
- html
| 일 | 월 | 화 | 수 | 목 | 금 | 토 |
|---|---|---|---|---|---|---|
| 1 | 2 | 3 | 4 | 5 | 6 | 7 |
| 8 | 9 | 10 | 11 | 12 | 13 | 14 |
| 15 | 16 | 17 | 18 | 19 | 20 | 21 |
| 22 | 23 | 24 | 25 | 26 | 27 | 28 |
